Recipes


House Wines: What I'm Drinking/Serving At Home

I'm proud to admit that I'm a total cheapskate.
I love nice things. But only specific things [suits, Apple products, my wife].
I don't love spending money on expensive wine. It's just not worth it to me.
I've been lucky that both my dad and father-in-law also love wine. Dad loves big Italians and F.I.L. loves big Napa cabs. Between the two I'm spoiled.
But I can't bring myself to spend more than $40 on a bottle of wine [Champagne doesn't count; it's a necessity].
I've found a handful of go-to wines that I always keep stocked. And I'm going to share them with you because you deserve it.
 Anthony LeDonne Loves Delacroix Brut NV As His House Sparkler


Goto Cocktails: Negroni, Martini, Manhattan
You may enjoy my food and cocktail pictures because...
5 Ways To Make Vegetables Not Suck

Most people hate vegetables. [Even fewer people can spell vegetables.]
But science and our waistlines tell us that they're healthy.
Why do they taste like grunt? [They don't, but I'm trying to empathize with you underlings.] Mostly because people rely on the two worst ways to eat vegetables: Steaming and Salad...ing [it's a thing].
Why do they steam and salad? Because they don't know how to cook them. But that's okay!
Enter...Me. [that doesn't sound right...]
I'm going to give you 5 ways to make veggies not suck and still keep them healthy. [I'm basically a wizard.] You're welcome in advance.
Here we go!
5 Ways To Make Veggies Edible [besides a salad]:
1. Roast 'em.
Toss veggies with olive oil and salt and throw them into a 450˚F oven until they're brown. Some will only take 10-15 minutes (green beans, asparagus) while some will take 30-40 [broccoli, onions, potatoes, root vegetables].
LAZY TIP: Put veggies on a foil-covered sheet pan, drizzle with olive oil and salt, and lazily move them around. No tossing. No need to wash a bowl.
2. Oil & Salt 'em
Many vegetables can be eaten raw and, with a bit of good olive oil and sea salt, are quite tasty. Try this with radishes, snap peas, baby carrots.
3. Sauté 'em
This is best with leafy greens. Heat a nonstick pan over medium-high, add a few small glugs of olive oil, throw a few handfulls of leafy greens, sprinkle with a little salt and then DO NOT TOUCH THEM. Don't mix them around. Brown them. Brown = flavor. Flip them when they smell browned [trust your nose].
4. Grill 'em
I don't grill often [because I live 44 floors above Manhattan like a cosmopolitan demigod] but when I do, I grill vegetables. Rub a little oil and salt on some baby bok choy or a quartered heart of romaine [I'm not even joking] and throw that sucker straight on the grill, medium heat works well here. You want it slightly charred and browned, but not completely burnt [unless that's your thing?].
Whatever you do...
5. DO NOT OVERCOOK 'EM
Soggy vegetables suck. Leave them with a little snap! No matter your cooking method, preserving some of their natural crispness will make them much more enjoyable to eat.
How to: Reheat Leftover Pizza

I live in New York City so I have to eat pizza 2-3 times a week [day].
But try as I might, I can't finish an entire pizza in one sitting.
I used to reheat pizza in the microwave, but that led to rubbery crusts and an almost-divorce [my wife has standards].
This method yields the absolute best combination of crisp under-crust [it's a thing] AND piping hot toppings.
And who doesn't love piping hot toppings.
Here we go...
How to Reheat Leftover Pizza
- Position an oven rack so it's about 6 inches from the coil. Preheat the broiler for 10 minutes. Sometimes I can't wait and only preheat for 5 [I have my faults].
- Preheat your cast iron skillet on high until it's smoking. For me, that's roughly 5 minutes.
- Slide a sweet sweet slice of pie into that hot pan and let it sizzle for 60 seconds. I'm not joking when I say I time this.
I'm a weeeee bit [completely] anal retentive. - Pop that pan under the broiler for 60 seconds.
I top my slice with a glug [technical term] of olive oil and some red pepper flakes because I like to live on the edge.
Silky Smooth Sweet Potato Purée

psst...pin me!
Last updated: February 18, 2026
Use this recipe when you have sweet potatoes and aren't sure what to do with them. Or when you're in the mood for mashed potatoes but don't want to do any work.
Or if your annoying coworkers won't stop talking about how "going Paleo cured his eczema" and you want to dip your toe.
It only takes 4 ingredients to blow your mind. Seriously. Try it.
Ingredients
Note: One lb of potatoes makes about 2-4 Servings
100% Sweet potato [Unless you live in Central or South America, you've likely never eaten a yam.]
20% Butter
30% Water
1% Kosher salt
If you don't have a scale [can you feel my rage?] you should get one. They're $10 on Amazon or in Walmart and it'll seriously help you get better in the kitchen. If you want to cook this right now without a scale, just guess. Start with a few tablespoons of butter and water. If it starts burning, add a bit more water. For salt, add some, stir and taste. Repeat until it tastes good.
Directions
Peel sweet potatoes and slice into small pieces about 1/4 in thick.
Weigh the sweet potatoes, and then measure out butter, water, and salt. If you have 500 g sweet potatoes—which is about a pound—then you'll need 100 g butter, 150 g water, and 5 g salt.
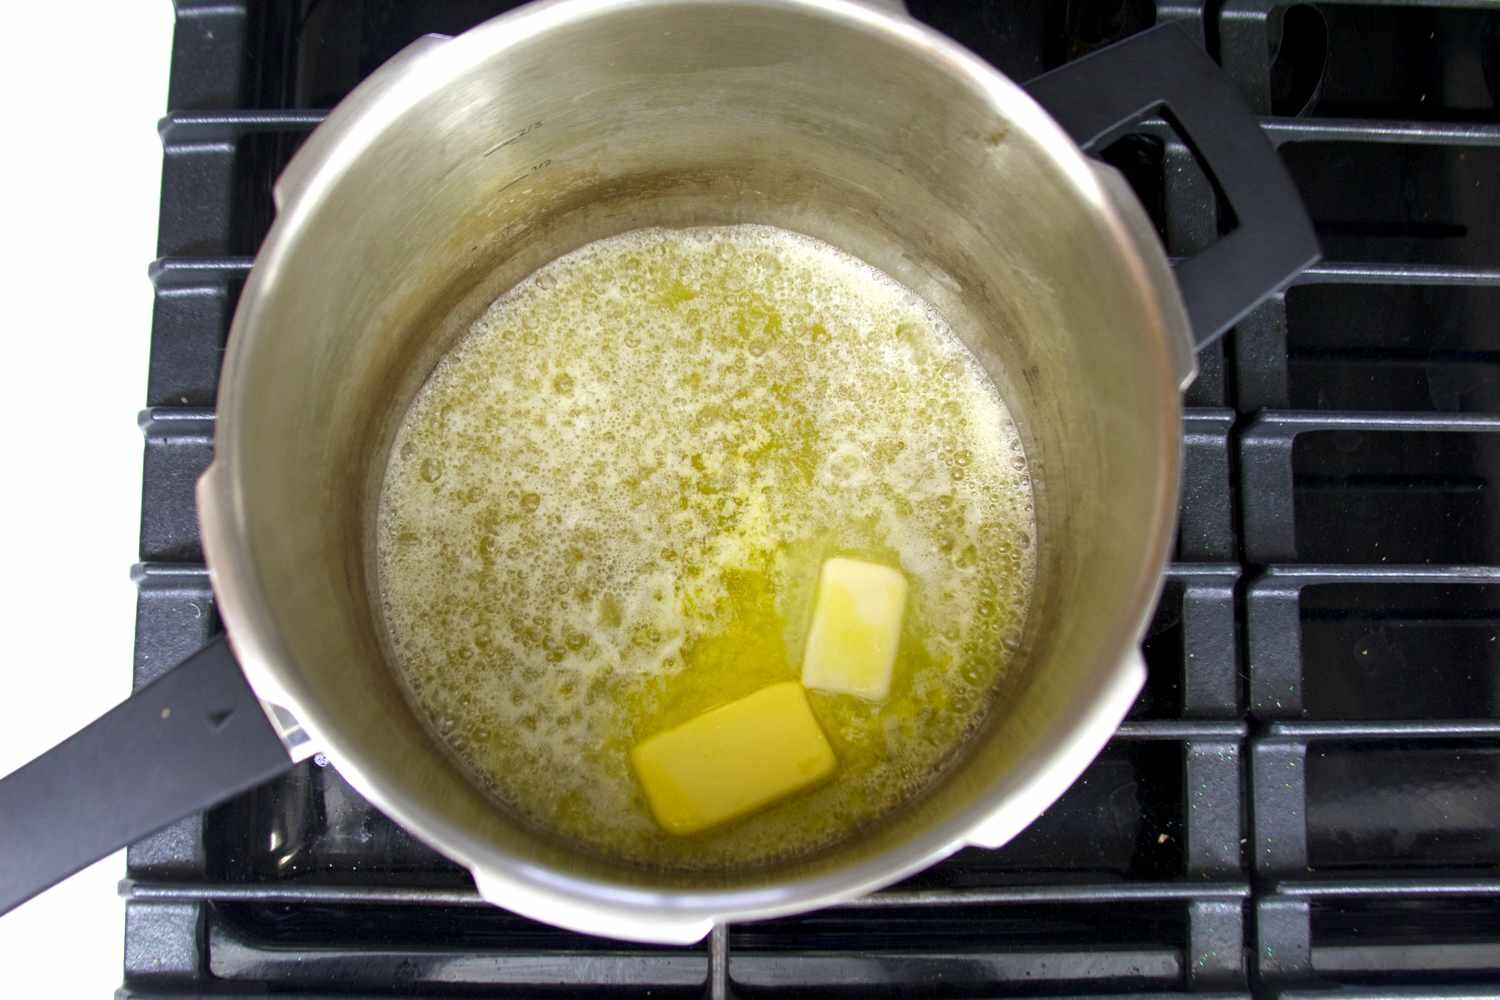
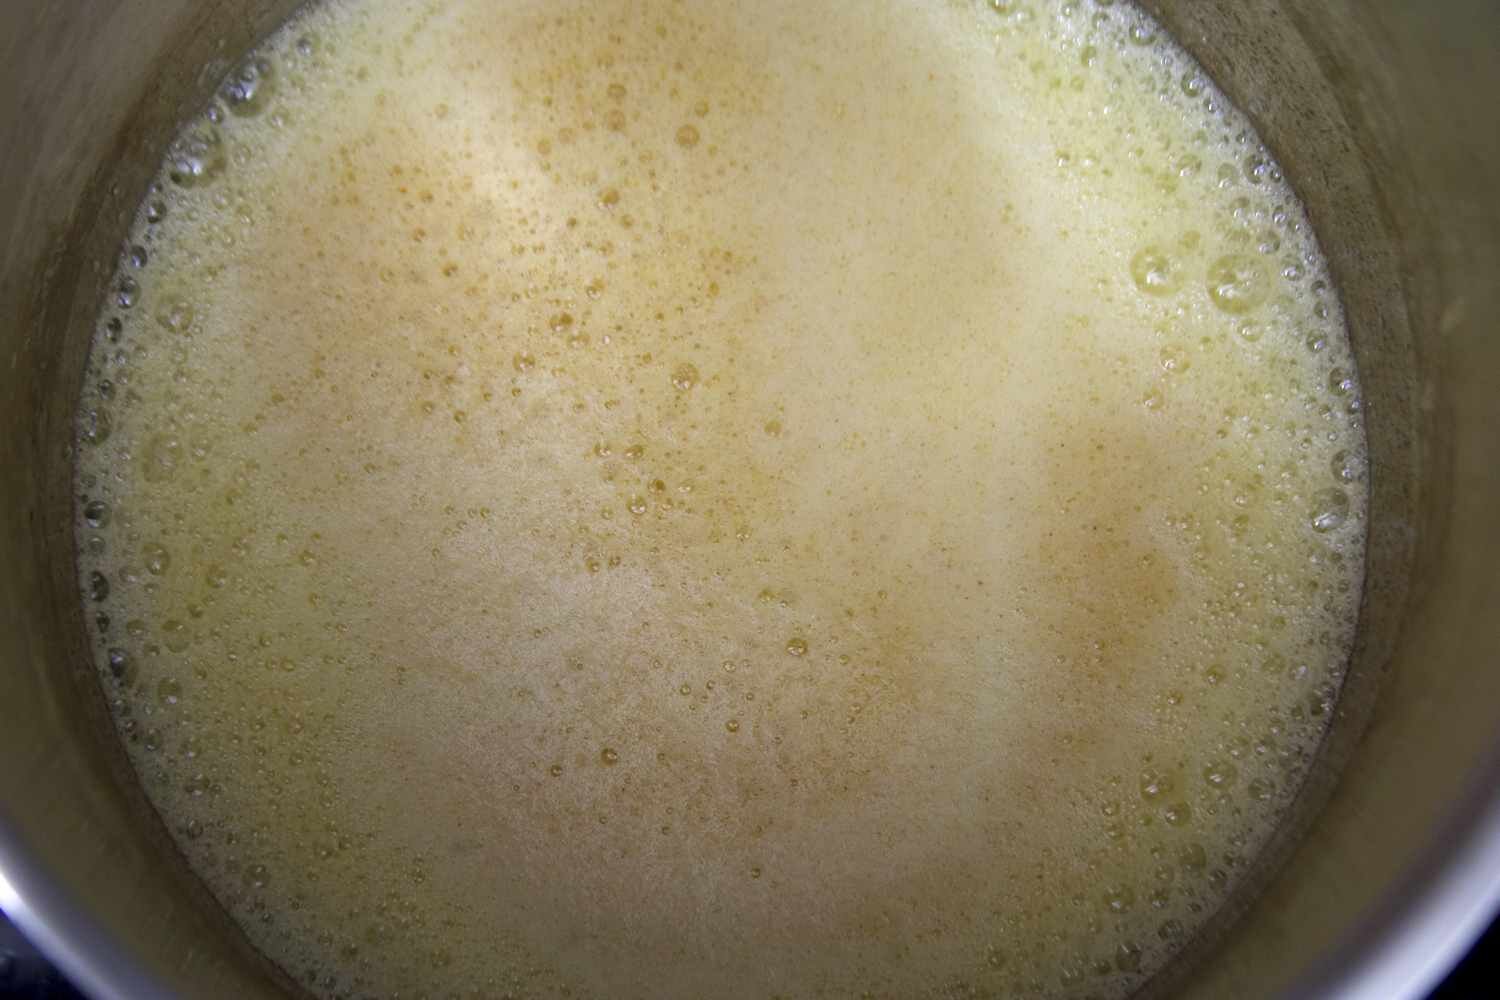
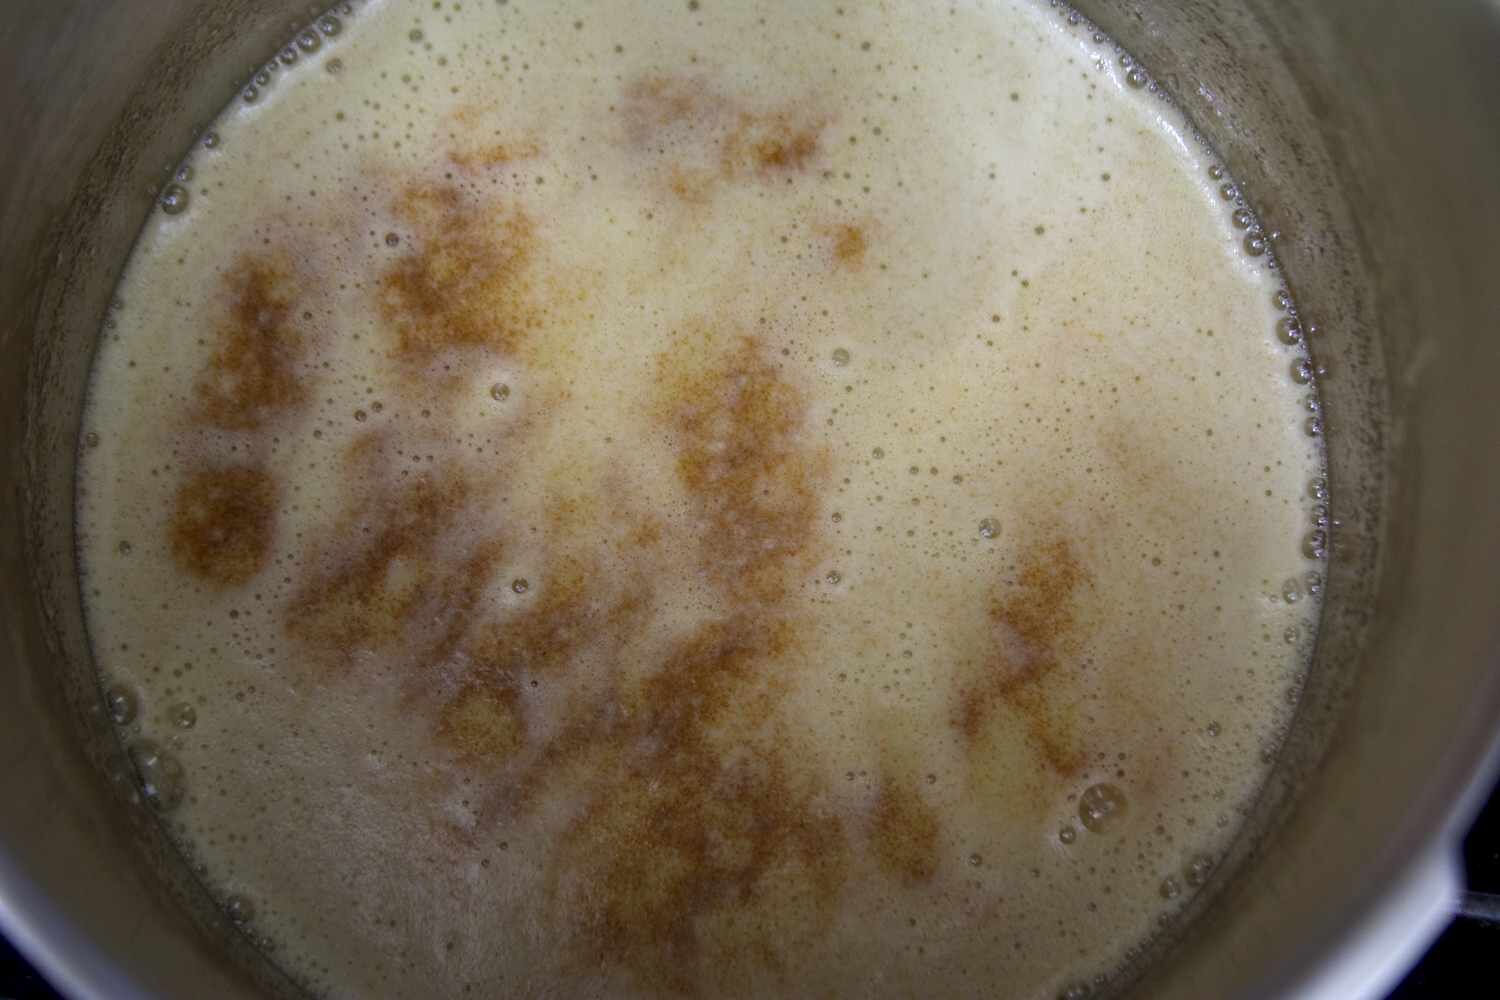
Heat a pan over medium heat and add the butter. If you like the flavor of brown butter [you should], let the butter sizzle, bubble, and brown. It's done browning when you smell nuts. If you don't like brown butter [and I judge you] go to the next step.
Add water, salt, and sweet potatoes and raise heat to high.
You don't need to stir this. Maybe once or twice. We want the potatoes to steam, but we also want them to fry. Frying them means browning them. Remember the brown butter from above? Brown = flavorful. Taste one. If it's soft-ish, or if it's at least lost its crunchy starchiness, turn off the heat.
Add everything from the pan into a blender and blend on high until it's smooth. If you have a Vitamix, blend for a minute and, if not, blend until Tuesday. You can add more butter or water if it's too thick. I usually blend on low because I like mine more sweet potato-ey and less buttery purée.
PRO TIP: You can make this into a soup by adding more chicken stock/water and continuing to blend.
Reserve to a plastic container. It'll keep in the fridge for 4-5 days.
"Mise en place" is French for "get your shit together."

This is what a typical dinner prep looks like in my kitchen. Everything is chopped, minced, unjarred, de-canned.
It's called mise en place [french for get your shit together].
I do this because I like to be relaxed and happy [moderately drunk] in the kitchen.
But this isn't how most cooks do things.
And it isn't how recipes are written.
Anytime a recipe says "while this is cooking, do that" I laugh.
Mostly because I suffer from not being able to take even the simplest situations seriously.
But also because "do this while that cooks" means I will:
- pour wine
- start chatting with whomever is around [my dog]
- wine
- burn something
- iwne [sic]
- forget to cut whatever I was supposed to cut because I'm on my third glass of wine.
Note, this is the ONLY area in my life where I'm prepared [just ask my wife/family/anyone].
But I'm a HUGE advocate for mise en place for several reasons.
"What are those reasons, oh Wise One?" you might ask.
And thank you for asking.
Number 1: Having everything chopped and prepped means that I can put away my knife and cutting board. I can clean up. Which means I'm less likely to knock over my glass of wine. Or the bottle [which may or may not have happened several times in the past year].
My kitchen is pretty damn clean when I cook. All prep bowls go straight into the dishwasher. Counters are wiped down. Knives are washed, dried, and put away [unless I'm feeling stabby].
This also means that, with all my ingredients measured and prepped, I can put my entire focus on cooking [wine]. It's a lot harder to burn something when you're watching it closely instead of multitasking.
It's hard to be a good host when you get lightheaded every time you knick your finger [ask me how I know], so mise en place helps me better enjoy the company of my company [wine].
Take it from me, an oft-unprepared lifelong last-minute-Larry, that a little prep goes a LONG way toward upping your kitchen game.
Try it. Just once. And let me know how it goes in the comments below.↓↓↓
Nachos


Wondering what other traditional mexican delicacy goes well with nachos?
How about a frozen margarita?
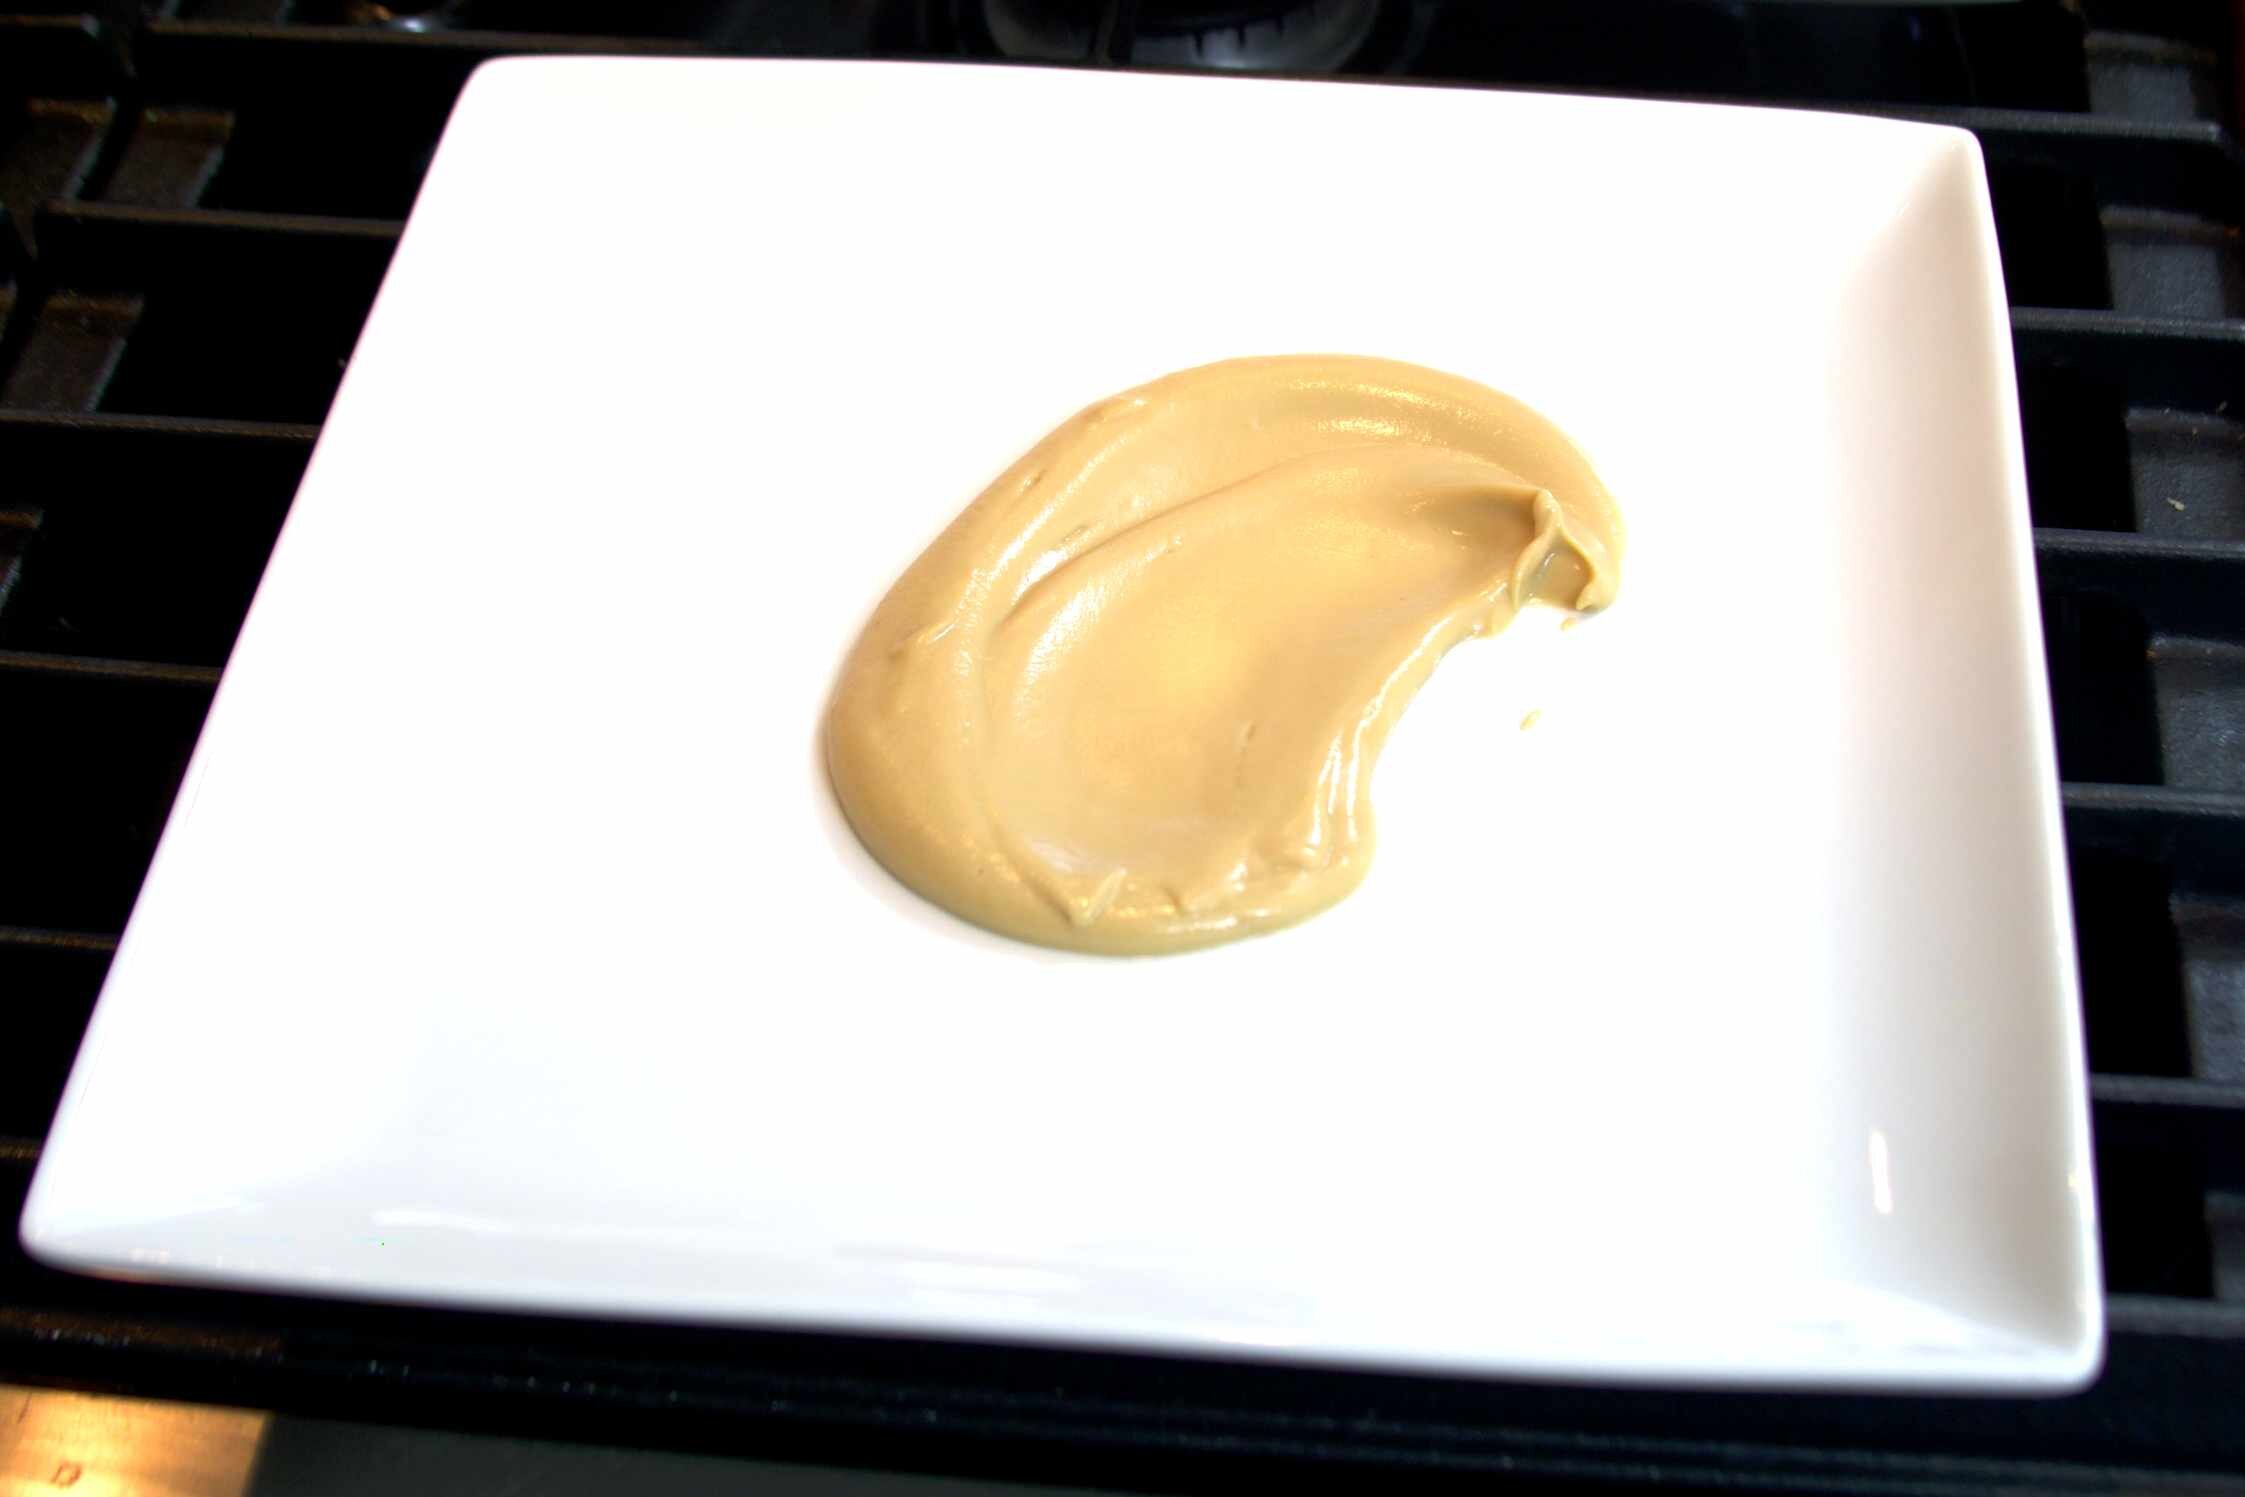
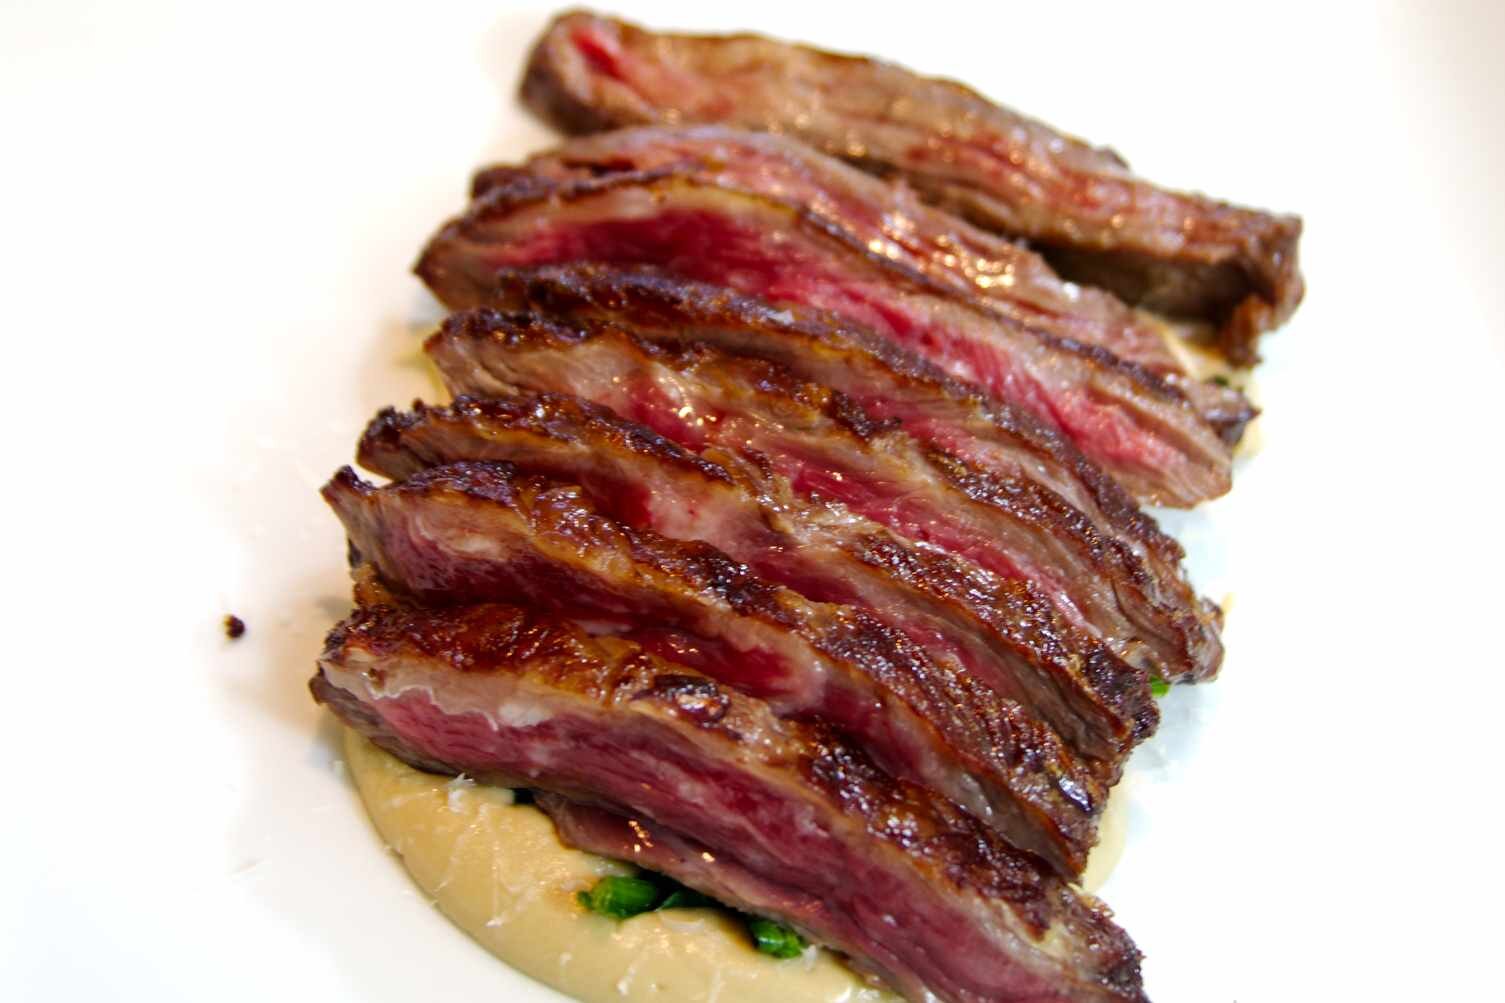
Skirt Steak, Spinach Salad, Brown Butter Cauliflower Glory
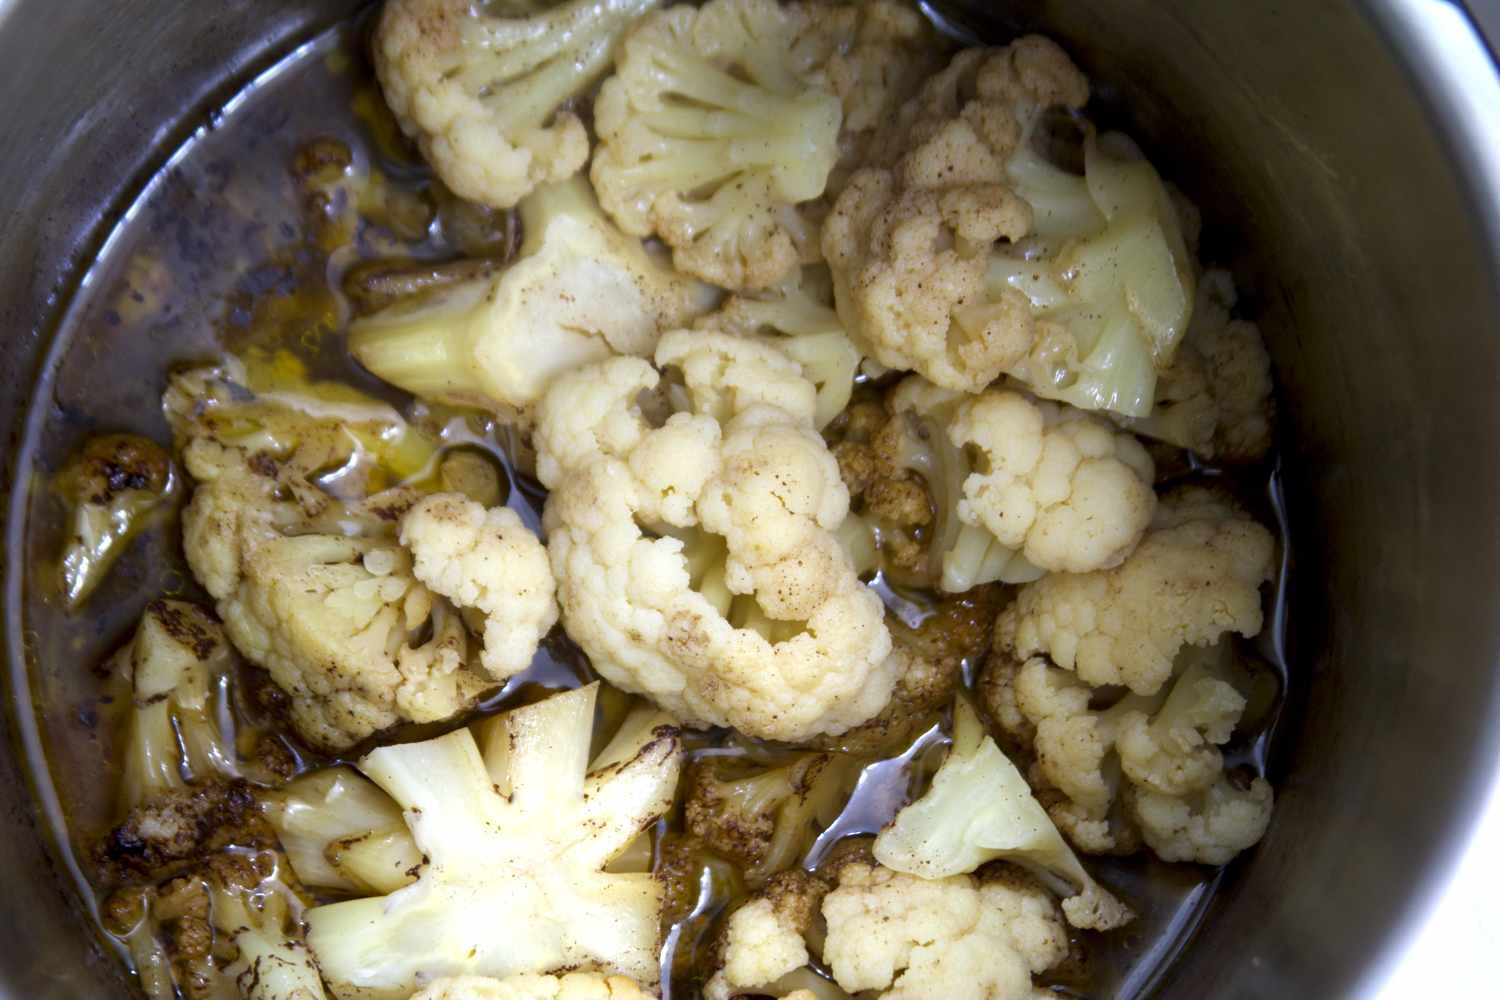
This was kind of a spur-of-the-moment meal that turned out to be mind-blowingly fantastic. The nutty creaminess of the Cauliflower Glory [purée] plays nicely with the juicy steak and the crunch onions from the salad. I will make this again. And again. And hope you do too.
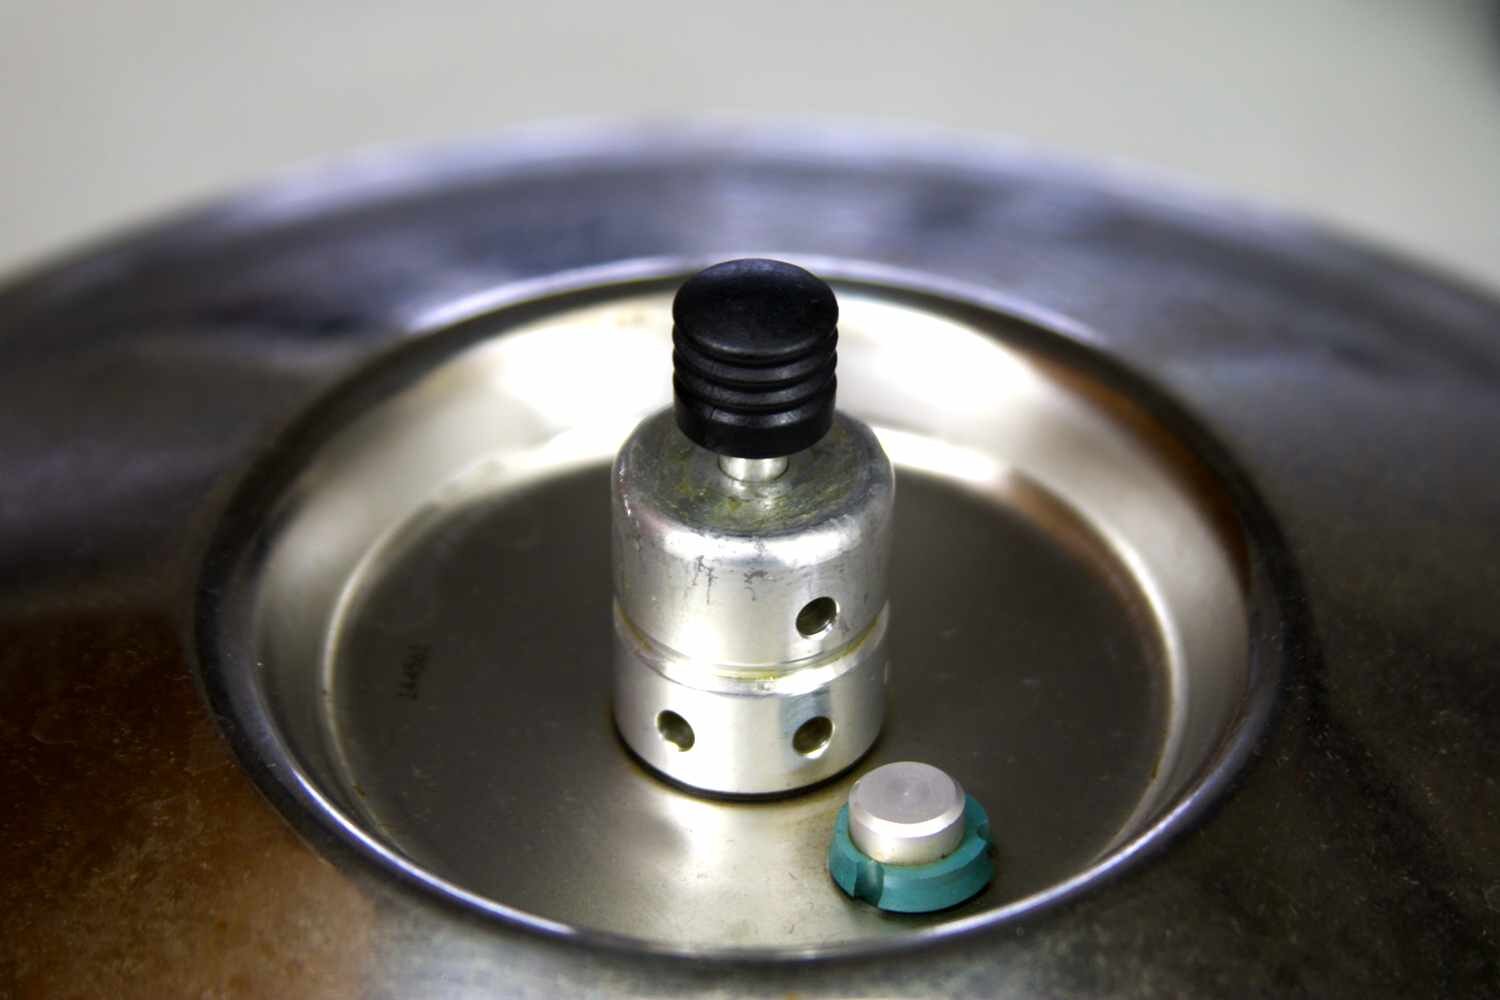
It's a 6 out of 10 on the difficulty scale only because you need a pressure cooker and a blender. Don't fret if you don't have a pressure cooker - just chop the cauliflower into very small pieces and steam them with some water. You WILL need a blender to achieve the luxurious creamy texture though. And the more powerful the better. (I love Vitamix.)
Cauliflower Glory
Can be made up to 3 days ahead of time. Keep in the refrigerator until you're ready to complete the dish.
Also, you can scale this up or down based on the amount of cauliflower you have. To scale the recipe up or down, weigh your cauliflower, and then multiply by the percentages of the other ingredients.
For instance, if your head is 800g, then you'd need: 120g butter, 24g water, and 8g salt.
My head was ~700g, so...
- 100% (700g) Cauliflower, roughly chopped
- 15% (105g) Butter
- 3% (21g) Water
- 1% (7g) Salt
Heat a pressure cooker over medium heat. Add butter. And brown it.


Once butter is browned (it should look dark brown and smell very nutty) add the cauliflower, water, and salt and stir.
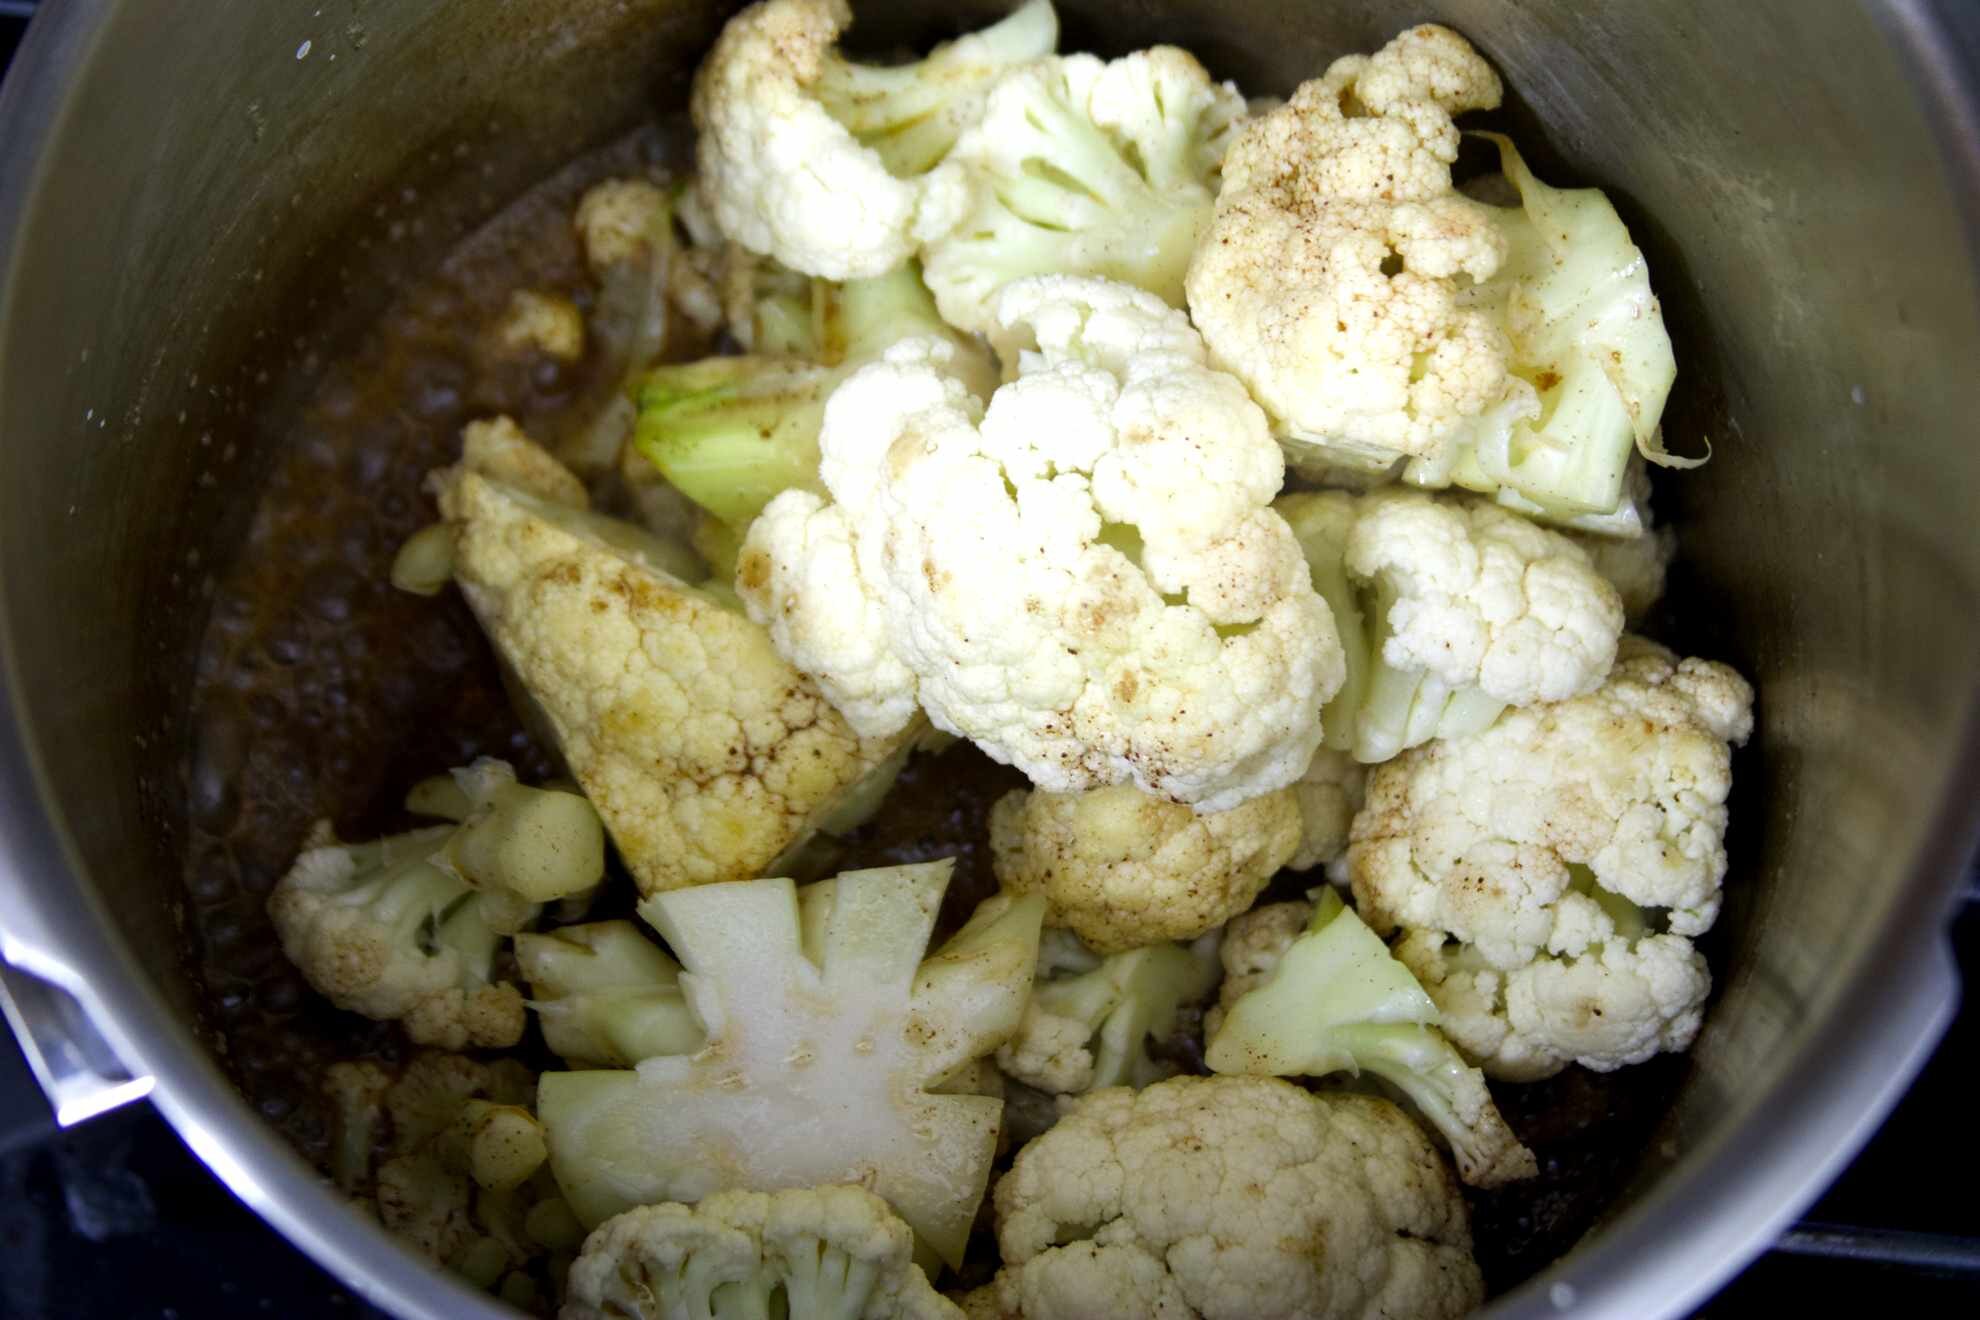
Seal the pressure cooker and cook on high (1 bar, the second ring) for 20 minutes.
Once the pressure cooker releases it’s pressure, remove the lid. If it looks really watery (use your judgement), heat it, uncovered, until it thickens up.
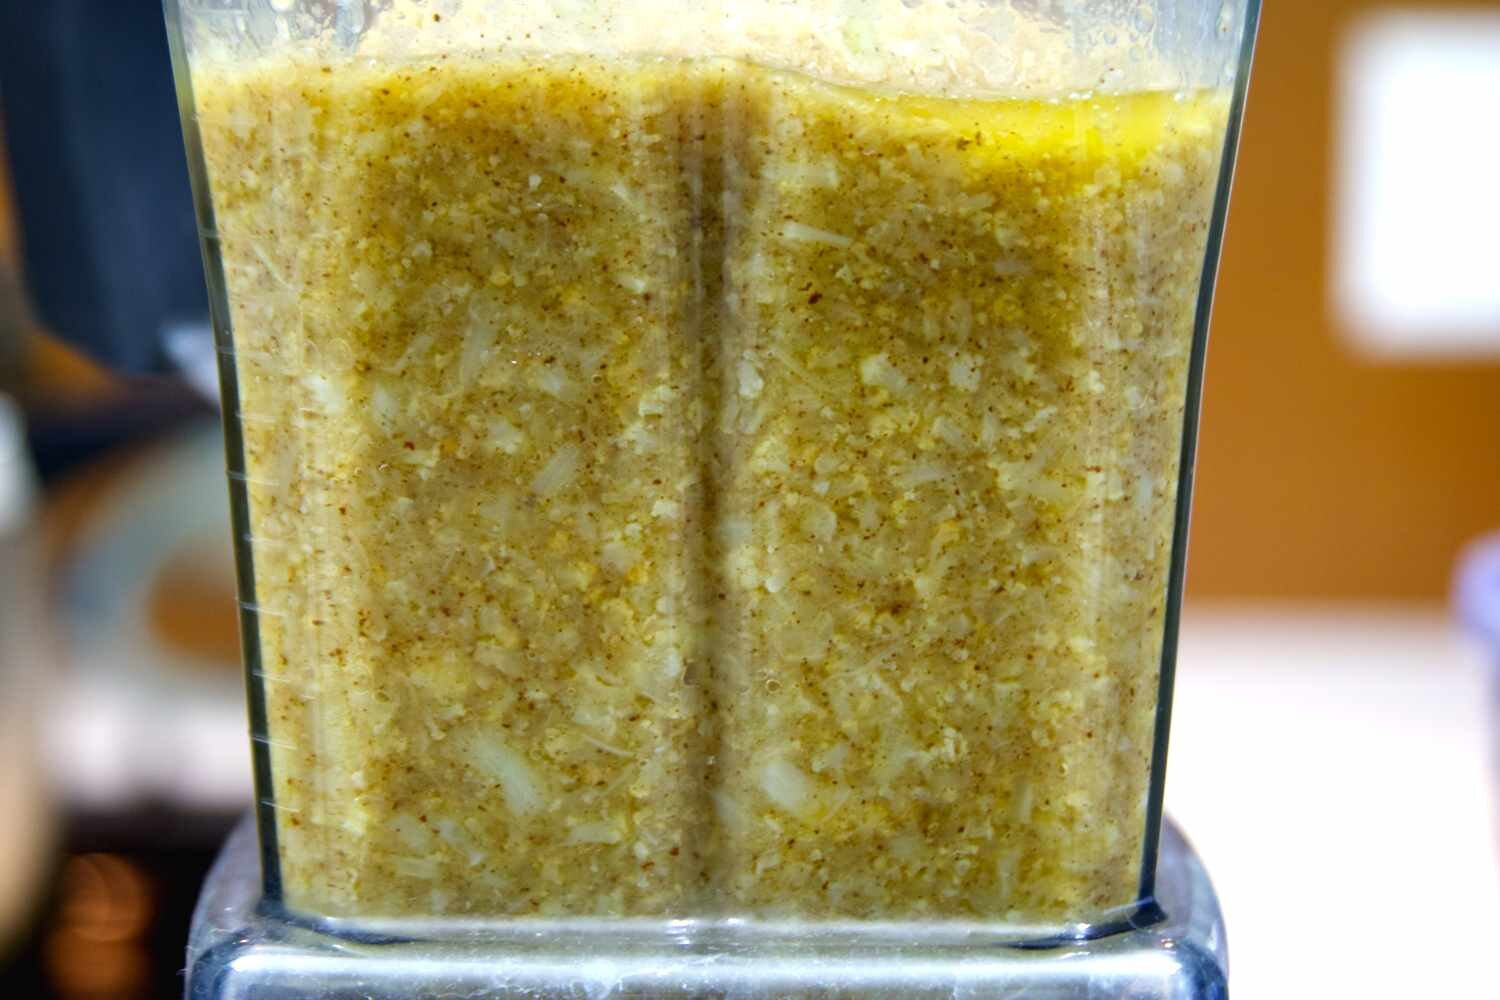
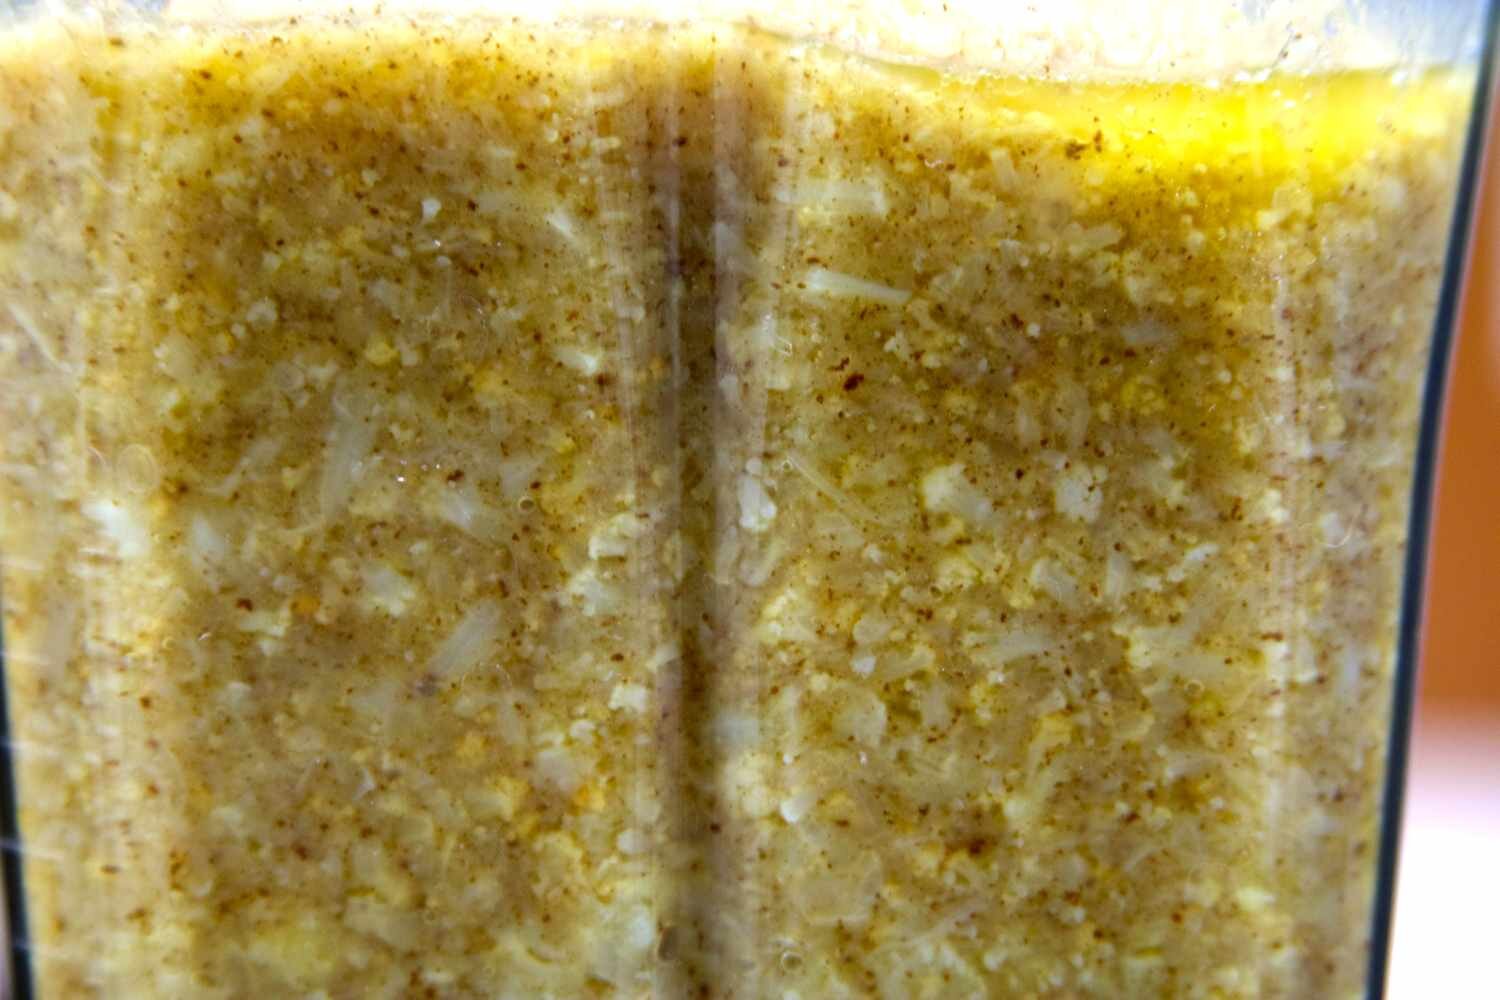
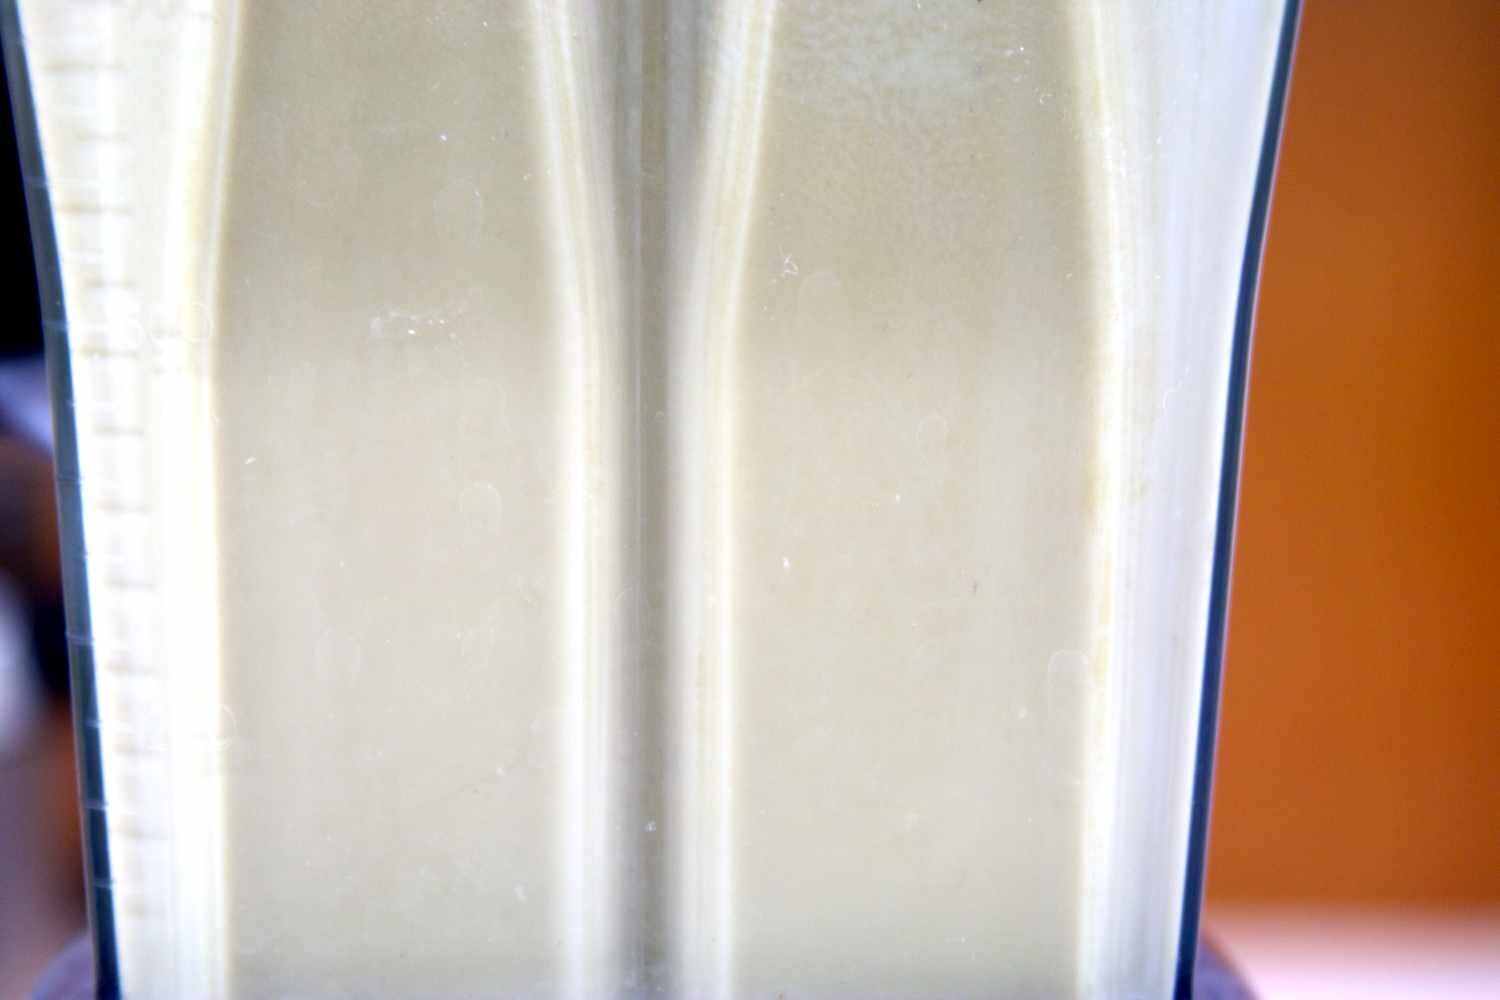
Blend in a blender until really really puréed. Like 5 minutes on ludicrous speed in a Vitamix.
Spinach "Salad"
- 200g Spinach, washed and dried
- 30g Red Onion, diced
- 10g Parmigiano Reggiano, grated
To finish:
Cook steak in frying pan over medium high heat until it's just medium-rare, about 2-3 minutes on each side.
Move steaks to a plate to rest. Add spinach to the pan. Don’t touch it...you want it to brown. Once it smells browned, mix it up a bit so the rest can brown. Once it’s very wilted and browned (5-8 minutes total), remove from heat and add the onion, stirring frequently. You’re just trying to warm the onions, not brown them.
Put a spoonful of Cauliflower Glory in the center of a plate. Run a spoon through it to make a pretty pattern.
 Let your inner painter Gogh wild...
Add some of the Spinach Salad, top with a few pistachios and grated Parmigiano-Reggiano cheese.
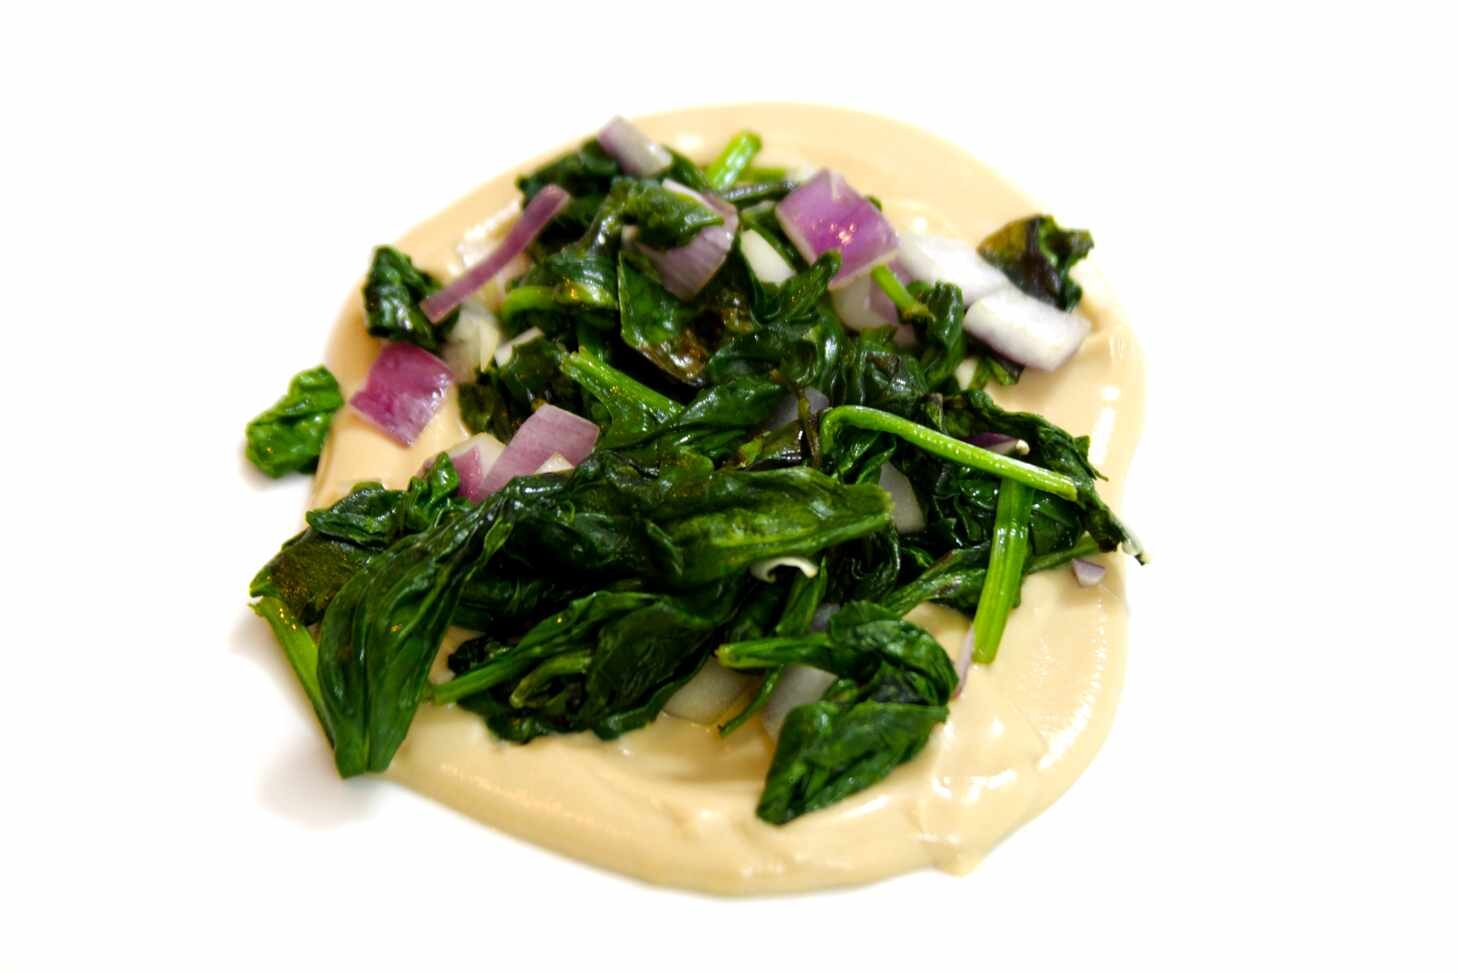 You should add double what you see here... I just didn't make enough spinach for two servings.
Slice the steak into 1/2” thick pieces and arrange on top of the Spinach Salad. Sprinkle with a wee bit of finishing salt.
[Yes, there is way too little green stuff to balance this picture. I've adjusted the recipe accordingly.]
 MEEEEAAAAATTTT
The Humbug Spritzer
Santa drinks because you're bad. Don't let him drink alone.
Santa drinks because you're bad. Don't let him drink alone.
Makes 1 cocktail
-
1oz Campari
-
4oz Sparkling wine [I used Delacroix Brut]
-
1 sprig of rosemary
1
Pour Campari into a champagne flute or coupe.
2
Add sparkling wine.
3
Garnish with a sprig of rosemary.
Serve to Santa to see if you can get back on the Nice list.
[Or not... *wink*]
Anthony's Man-Cold Grog
When a Man gets sick, the world must pay.
When a Man gets sick, the world must pay.

The only thing that can cheer up a Man stricken with a Man-Cold is a Man-Cold Grog [Yes the capitals are deserved, as any Man who has endured a Man-Cold will tell you].
And so I give this to not my fellow Man, but to every Woman who has put up with a Man with a Man-Cold.
-
2 oz aged rum (I use El Diplomatico Reserva Exclusiva 12yr)
-
1/2 oz freshly squeezed lime juice (I don't measure when I'm sick; it was a gentle squeeze of half a lime.)
-
2 Tbsp honey (use as much or as little as you need)
-
8oz water
1
Tell the world you have a Man-Cold.
2
Boil the water.
3
Add all ingredients to your Man-Cold Grog mug and stir, consume, and repeat ALL steps.
What the F is Myzithra?!?
I know what you're thinking, "Brains, Brawn, AND Beauty? How lucky can one guy be?" [very lucky]
You're probably also thinking, "What the heck is Myzithra and why does he keep using it? And how can I be more like him?"
We'll address your first two questions, since the last is more of a philosophical lifestyle choice. [I don't even know what that means.]
Mizithra is a dry, salty sheep milk cheese from Greece. It's like Italian ricotta salata, but drier.
It's one of Wiff's favorite cheeses. She developed a love for it at the Old Spaghetti Factory restaurant in our hometown, Tacoma, WA.
I don't know why, but it's almost impossible to find in New York. This seems strange to me, since they have a billion other cheeses. If she sees it she buys it, and if she buys it I cook with it.
If you see myzithra called for in any of my recipes and you can't find it, you can try ricotta salata (NOT regular ricotta), or maybe even Parmigiano-Reggiano or Pecorino. It'll taste totally different [still awesome] but texture-wise it'll be close enough.
Enjoy!
Mushroom Scramble [demo]
Hello!
I'd like make short videos showing you how to cook wondrous things, but first I need your feedback to make it better.
If you watch the video below, I'd sure appreciate it if you could share your thoughts in the form, also below.
Even if you don't share your opinion [selfish turd] I hope you find these videos useful!
Sweet. Thanks!
Butter & Sage Linguine
Ingredients
Total Time: 15 minutes
Makes 2 Servings
-
225g Fresh Linguine/Spaghettini/Angel Hair
-
30g Butter
-
10 sage leaves
-
40g Parmigiano-Reggiano
-
1 Lemon
Recipe
-
Brown the butter.
Put the butter in a small frying pan over medium heat. Once it melts, it'll start bubbling. Then the bubbles will subside. And then my friends...and then it will start developing lovely toasty flavors and aromas.
Watch it closely once it starts smelling nutty. You want it brown, not burned. See how brown you can get it before it develops burned flavors. It's a fun game.
Once it's nice and nutty, throw in the sage leaves and remove from the heat. The sage leaves will crackle a bit. That's perfectly normal and it's just the sound of them crisping up nicely. -
Cook the pasta.
Cook it according to the package directions. I usually do a minute less than the package calls for because I like it al dente. I usually end up cooking it for a minute in the sauce, which finishes it perfectly.
Oh, and I shouldn't have to explain this again, but salt the hell out of your water. It should taste like the ocean before you add the pasta.
If you're worried about sodium levels, fear not. Most of the salt stays in the water. But you do want to flavor the pasta, since it's flavorless otherwise. -
Mix and Serve!
Once the pasta is finished, remove it with tongs or a skimmer and dump it straight into the pan with the butter and sage. Add the cheese, a squeeze of the lemon, and some pasta water (1/4 to 1/2 cup) and toss to combine.
When Your Bread's As Stale As Your Jokes
Crostini is the answer to the question "what can I do with this two day old baguette besides throw it out or beat my dog?"
Having lost it's initial freshness, but not yet possessing the brittle dryness of a giant baguette-shaped-bread crumb, two day old baguette is in culinary limbo. It's just sitting there in the pantry, a dead loaf walking. awaiting it's final destiny, being pulverized to smithereens [always wanted to use that word] as breadcrumbs.
I, being an outside the breadbox thinking young lad, decided to give it a second chance [recidivism is low in our pantry] and offered to commute its sentence if it agreed to take a little heat.
...
I can't keep this up. Allegory over!
Long story short: Two day old baguette makes perfect toast!
Ingredients
Makes 2ish servings
-
Half a baguette, two days old.
-
4 tbsp Extra Virgin Olive Oil
-
1 garlic clove, peeled
-
Kosher salt
Recipe
-
Put a piece of foil on a half sheet pan [or whole, if that's your thing]. This is my fave. Place your oven rack in the highest position that gets the bread closest to the heat without touching it.
Yeah, if you click that and buy it I make money. -
Cut the two day old baguette into 1/2 inch thick pieces and arrange them in one layer in the foil-lined sheet pan.
-
Glug some extra virgin olive oil onto the bread.
Try to do it evenly but don't stress if it's not. This is the toughest step if you're culinarily OCD-ish like me... but just trust that the heat and capillary action will help the oil equilibrate in the bread.* Resist the urge to get an aerosolizer... Single-function tools have no place in your kitchen.
*complete fabrication. -
Broil that slicked up two day old bread until it's good and toasted. Rub the peeled garlic clove on the toasted crostini. Sprinkle that oily, garlicky bready goodness with salt.
The toasted, hardened surface of the crostini acts as a grater of sorts. It always amazes me how little the clove is after rubbing it on all the slices.
chicken & egg, AT THE SAME TIME [mind blown]
The little waste-not-want-not gremlin within me gets off on using leftovers.
The little waste-not-want-not gremlin within me gets off on using leftovers.
I cooked a chicken last night and didn't eat all of it [because I'm not a complete caveman]. And my normal routine of 4 whites and 2 yolks [don't fret, I save the yolks for quick custard] felt like it wanted to reconnect with its chicken mama.
That, and Wiff not-so-subtly took all the ingredients out of the fridge as a hint that it was feeding time.
Total Time: 15 minutes
Serves 2
300 calories / serving
Ingredients
- 4 egg whites
- 2 egg yolks
- 40g cheddar cheese [1 handful; about 1/2 cup]
- 2g kosher salt [ two three-finger pinches]
- 4g Canola oil [1 tbsp-ish]
- 100g Kale [two-handed handful, manhand sized]
- 100g leftover chicken [breast and thigh meat plus some unidentifiable meat parts]
- 25g leftover red onion [maybe 1/3 c?]
- 1/4c water [optional, to help wilt the kale]
RECIPE
- Whisk together egg yolks and whites and half the salt in a bowl.
Keep whisking until it's a homogeneous mixture. You don't want be snotty chunks of white in there. [Or maybe you're into that?] - Add oil and kale to a large frying pan and heat over medium high heat. Don't touch it.
Seriously, the only way these superfoods/weeds taste good is when they're browned [scroll to the bottom of that page for more info]. - Once the kale bottoms are browned, flip them over. Add the chicken and onion. Mix to combine, and then DO NOT TOUCH. You want everything browned.
Taste the kale. Does it taste good? You like that? If not, add the last gram [three fingered pinch of salt]. Then reserve the kale mixture to a bowl. - Melt the butter in the same pan [#onePotMeal] and adjust heat to medium-low. Add eggs.
Most people fuck scrambled eggs up. Put down the mimosa for 5 minutes and give these eggs the love and attention they deserve. Some chicken [probably the one you had last night] surrendered its eggs so that you could grow big and strong. Don't let it down. - Slowly stir the eggs with a silicone spatula. You can add the cheese all at once at the beginning or intermittently as the eggs scramble [my fave]. DO NOT OVERCOOK THE EGGS.
Remember what I said about most people overcooking them? They get too dry and then they taste like shit. If your eggs usually suck [they probably do] then experiment with me [wink] and remove them from the heat when they look just a little underdone to you. They should be shiny. They will continue to cook on the plate.
Experiments with Laughing Gas
Those of you in the know are well aware that I recently bought an iSi Gourmet Whip Plus. Most people use them to make whipped cream, a purpose which this devices handles deftly, but we are not most people.Fancy chefs also use these for foams and emulsions. [We'll save those for a latter date.]Today we'll be using it to infuse booze with flavor.Our first base spirit is white rum.Why white rum?Because I don't keep vodka in my house and the white rum was the cheapest base spirit I had available. I think I paid $14 for a full liter.And I love daiquiris.So much.*...drinks two daiquiris...*aaaand we're back.The results were absolutely fantastic.GIVE IT A SHOT.
Basic Infusion Recipe:
- 10g of something (lemon, pistachios, etc)
- 10g of some complementary flavor (basil, coffee, etc)
- 120ml (4oz) base spirit (vodka, rum, whiskey, etc)
Equipment:
- Cream whipper (e.g., iSi Gourmet Whip Plus)
- N2O charger (not CO2)
- A sturdy liver
Recipe
- Add all ingredients to the whipper, secure lid, charge with N2O charger, and shake for a few seconds.
- Gently swirl or vigorously shake for 60 seconds.
- Slowly vent the gas. [Feel free to inhale if you like rum-flavored whippets].
- Strain and reserve the liquid. Discard the solids. Use in your new favorite drinks!
Pistachio Coffee Rum
Ingredients
[makes 4oz infused spirit, enough for 2 cocktails]:
-
10g Shelled Pistachios [small handful]
-
10g Whole Coffee Beans [small handful
-
4oz (120ml) white rum
Special Equipment:
-
Whip cream dispenser [e.g. iSi Gourmet Whip]
-
1 N2O charger [do not use soda chargers]
Use in:
Recipe
-
Put all ingredients into the whipper. Close the whipper and charge with the N2O charger and shake for a second or two.
-
Wait 30 seconds and then shake again.
-
Wait another 30 seconds, slowly depressurize, then open the whipper. Strain the now-flavored rum into a small carafe/vessel and use in a drink.
Dolores Umbridge

Ingredients
-
1.5oz Gin
-
1oz Campari
-
1oz Freshly Squeezed Lemon Juice
-
1/2oz Triple Sec [the cheap stuff is preferred here]
-
1 egg white
Recipe
-
Add the egg white to an empty shaker, seal the shaker, and shake for 30 seconds.
-
Add all ingredients to the shaker and fill with ice.
-
<potterReference>
Shake and repeat "I must not tell lies" enough times to let the message sink in.
</potterReference> -
Strain and pour into a chilled cocktail glass.
Polyjuice Potion

Polyjuice Concentrate
Ingredients
-
1 english cucumber
-
1 large handful spinach
Recipe
- Throw cuke and spinach and blend until smooth.
- Reserve. [Reserving things is fancy-speak for "put in a jar" or "don't throw it out."]
Polyjuice Potion
Ingredients
-
1/2oz PolyJuice Concentrate [hopefully you saw the recipe above?]
-
1/2oz Gin
-
1/4oz Freshly squeezed lime juice [ALWAYS freshly squeezed]
-
1/4oz Green Chartreuse [don't use yellow; it's much too mellow for this]
Recipe
- Add all ingredients to a shaker full of ice.
- Shake and strain into a chilled cocktail glass.